My Forms Layout
What includes the layout and user interface of the "My Forms" page and what you can do on this page
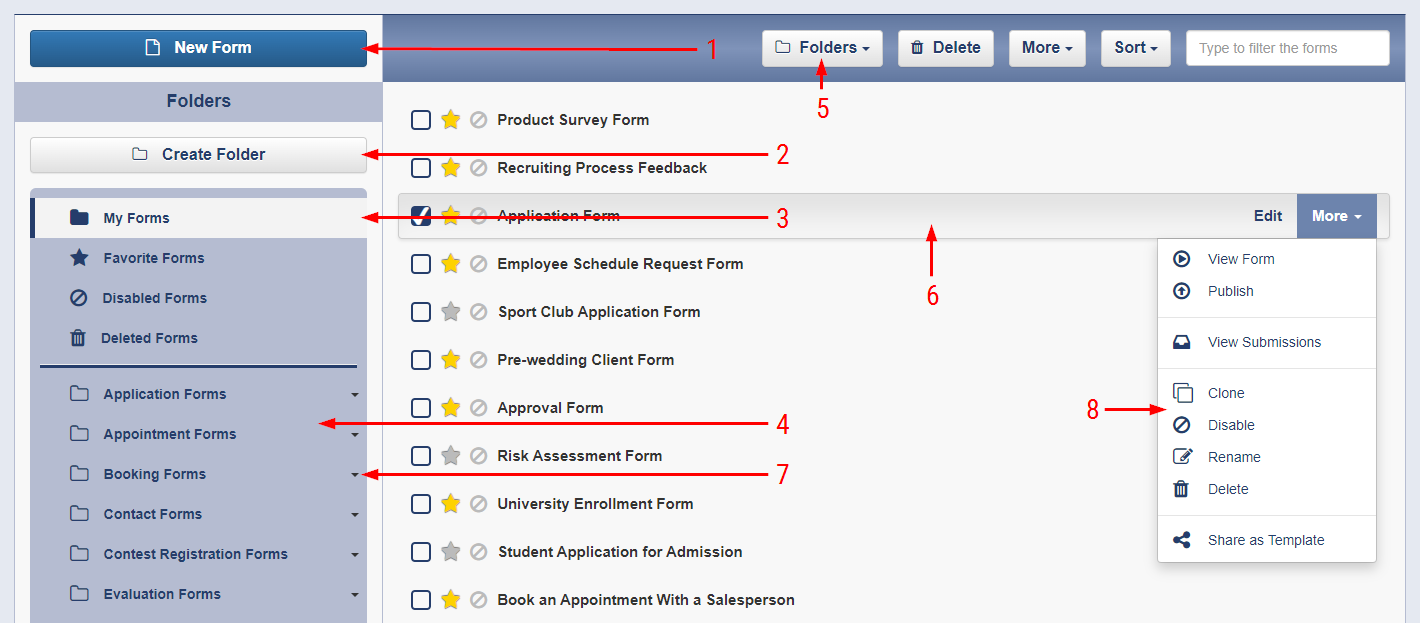
1. New Form - Click this button to choose from the available options to create a form.
The available options are:
1) Blank Form - you start a new form from scratch.
2) Clone Form - you can clone an existing form from your own ones.
3) Use Template - you can clone an existing publicly available template and to modify it easily and quickly so that it looks like and behaves as you wish.

2. Create Folder - Use this button to create a new user folder.
3. System Folders - These are default folders that allow you view and filter form list by various status of each form. If you make one or more forms as favorite by using the "star" icon ("") located on the action bar of a selected form (the Form Action Bar - number 6), you will be able to view all favorite forms by selecting the "Favorite Forms" folder. If you disable particular forms you can view them by selecting the "Disabled Forms" folder. The "Deleted Forms" folder shows all forms having status "deleted". Those forms are not actually removed by the system and you can restore those at any time, but until the forms have status "deleted", they will not be available for using by users on the web, editing, publishing, viewing their submissions, etc. I you would like to remove entirely deleted forms, you will need to select one ore more forms from the "Deleted Forms" folder and to click the "Purge" button on the Main Action Bar, or if single form is selected only, you can perform that action from the Form Action Bar by clicking the "More" dropdown and then select "Purge".
4. User Folders - These are folders that you as an account owner is able to create and manage. They can help you organize your forms by naming the folders by particular categories for exmple: by industry, department, specific case of use, campaigns, dates, etc., so you can easily filter forms by selecting a particular folder. You can create a new User folder by clicking the "Create Folder" button (number 2), enter a name and click the "Create" button. You can create a User subfolder by clicking on the arrow in right edge of a User folder (number 7).
5. Main Action Bar - Using the buttons available on the bar you can perform common action for one or more selected forms. If single form is selected, you can link that form to particular
folder(s) by clicking the folders dropdown, then you need to turn the checkbox(es) for each folder that you would like the form to link with and to press "Apply". You can also unlink
forms from folders by unchecking and press "Apply".
By the "Delete" button you can delete one or more forms. Once deleted, the forms will be moved to the "Deleted Forms" folder.
In order to select multiple form, you need to turn the checkboxes) on the left of the form's name. You can also select / unselect all displayed forms in the list by selecting
"Select All" / "Unselect All" from the "More" dropdown button on the Main Action Bars.
If you need to disable single form, you can perform this by clicking on the ban icon (""). Alternatively, you can enable that form later by clicking again the
same icon. If you wish to disable / enable multiple forms simultaneously, you will need to select as many as you wish and then to choose "Enable" / "Disable" from the dropdown menu
available by the "More" dropdown button on the Main Action Bar.
To sort the form in the list by particular parameter, click on the "Sort" dropdown button and select one of the available options.
By typing text into the search box on the right end of the Main Action Bar you can quickly filter the forms list.
6. Form Action Bar - This bar display all available actions you can perform for a selected form.
You can edit a form by clicking the "Edit" link on the bar and this will take you to the Form Designer where you will be able to do that.
To select different actions click on the "More" dropdown link.
To view a selected form in run time (live) mode select "View Form" from the menu. To view a the selected form in run time (live) mode select "View Form" from the menu. This action
will open the form in a new tab on the browser.
To publish a selected form click the "Publish" link from the menu. You will be navigated to the "Publish" page where you will be able to publish the form by various set of
options. Learn more.
The "View Submissions" link will take you to the "Submissions" page where you will be able to view all submitted data, to view and edit submissions and uploaded files, to
export and delete submissions, etc. Learn more.
From the "More" dropdown menu you can clone directly the selected form, to disable/enable, rename and delete it.
The "Share as Template" option give you possibility to share your forms as templates.
Learn more.
7. User Folder Menu - This menu lists the available actions that a user is able to do on a particular folder.
New Form - This action will create a new form that will be automatically linked to a particular folder or subfolder.
Create Subfolder - This action will create a subfolder for the given folder. You can create up to 3 nested subfolders on depth.
Rename - This action will rename a forlder or a subfolder.
Delete - This action will delete a particular folder or subfolder and all their child subfolders. The forms will not be affected form this operation and will be available by
selecting System folders or User folders that they are linked with.
8. Form Action Menu - This menu lists the available actions that a user is able to do on a particular form.
View Form - This action will open a form in a new browser tab or window and will run the form in run-time mode.
Publish - This action will take you to a new page where you can choose from available options for publishing a form. There are various settings for the different publish options.
View Submissions - This action will take you to the "Submissions" page. On this page you can view submissions for the chosen form. there are various actions to do on that page as for
eample: Export submissions to a file; Delete submissions; Confogure which fields (question) you want to see on the submission table or to export; View a submisison;
Edit a submission; Send a submission to email; Search submissions; etc.
Clone - This action will create a new copy of the selected form and will open it in the Form Designer for editing. Then you can set the form name and to edit the cloned form as you want
and to save it as brand new form.
Disable - This action will disable a form so that it will not be available for the other users. A disabled form still will be availabel for viewing from your account, but there will be
an red indicator that will show "Form Disabled" status.
Rename - This action will rename the Form Name of a form from the list.
Delete - This action will delete the selected form from the list. The form will be moved in the Deleted Forms list. There are no limitation for the number of the forms in the Deleted Forms
list nor for the time which those ones reside there for.
Share as Template - This action allows you to share a form as a form template which to be used from anyone once the the template is reviewed and approved from a FormWarePro administrator.
Learn more in the next section.