General View
Main layout, navigation and action bars
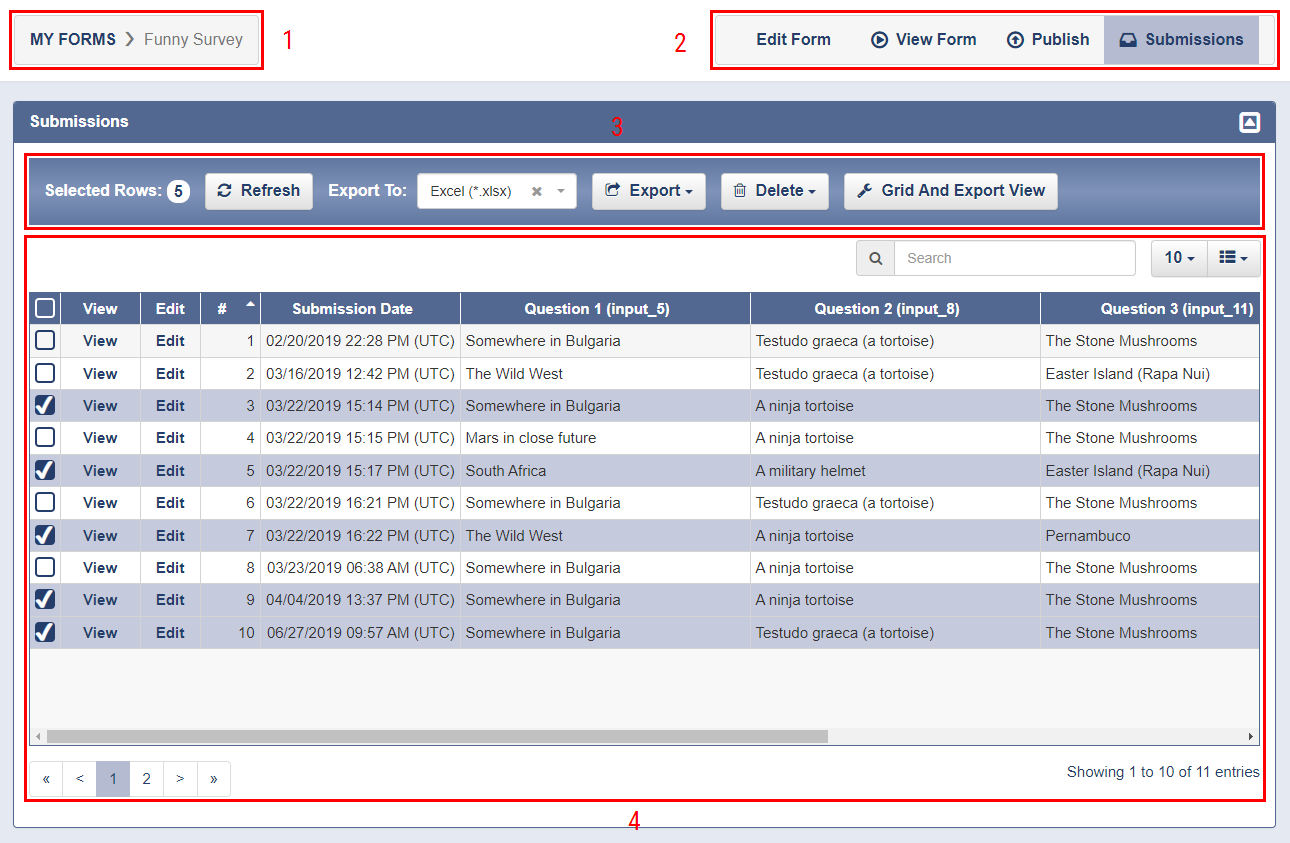
On this page you can view submissions for a particular form. The common view of the page looks like the screenshot below. It shows the Submission panel, an information
breadcrumb trail and a navigation bar which are described in details below:
1. "Submission Breadcrumb Trail" - It starts with a navigation link that will take you to the "My Forms" page. The text next to the right arrow shows the name of the form.
2. "Navigation Bar" - It contains navigation links that will take you to other pages allowing operations for the particular form.
3. "Action Bar" - It contains information for selected rows, buttons and a dropdowns for available actions on the submissions.
4. "Submission Grid View" - It contains a grid view showing submissions and submitted data, a search box above the grid view for quick filtering of the displayed rows and data,
a dropdown allowing you to choose the number of the displayed rows in the grid view, a dropdown allowing you to choose which system information and user's fields to be
displayed on the grid view, pagination on the right below the grid view allowing navigation on the grid view pages and information for the currently dispayed rows
and the total number of submissions dispayed on the left below the grid view.
The Submission panel consists of item 3 and 4 and can be collapsed for convenience through the icon on the top right corner of the panel.
Navigation bar
The navigation bar contains links described below which will take you to other pages for the current form:
- (1) - "Edit Form" - it will navigate you to the FormDesigner page where you can edit, customize and stylize the form.
- (2) - "View Form" - it will open a new tab or browser window and will run the current form there in run time (live) mode.
- (3) - "Publish" - it will navigate you to Publish page where you can chose from various options to publish your form.
- (4) - "Submissions" - it will reload the currently viewed page.

Action bar
The action bar contains following information label, select box and buttons:
- (1) - "Selected Rows" - Shows the total selected rows on all pages.
- (2) - "Refresh" - Reloads the grid view and resets the search box, the number of displayed rows, displayed system information and user's fields, the paging information and currently dsplayed page to their default values.
- (3) - "Export To" - Allows you to select a format which to export selected submissions in.
- (4) - "Export" - Exports submissions in the selected format through "Export To" select box. You have options to export only the selected submissions or all submissions.
- (5) - "Delete" - Deletes submissions. The deleted data cannot be restored. You have options to delete only the selected or all submissions.
- (6) - "Grid And Export View" - Opens the "Grid and Export View" popup.

Submission Grid View
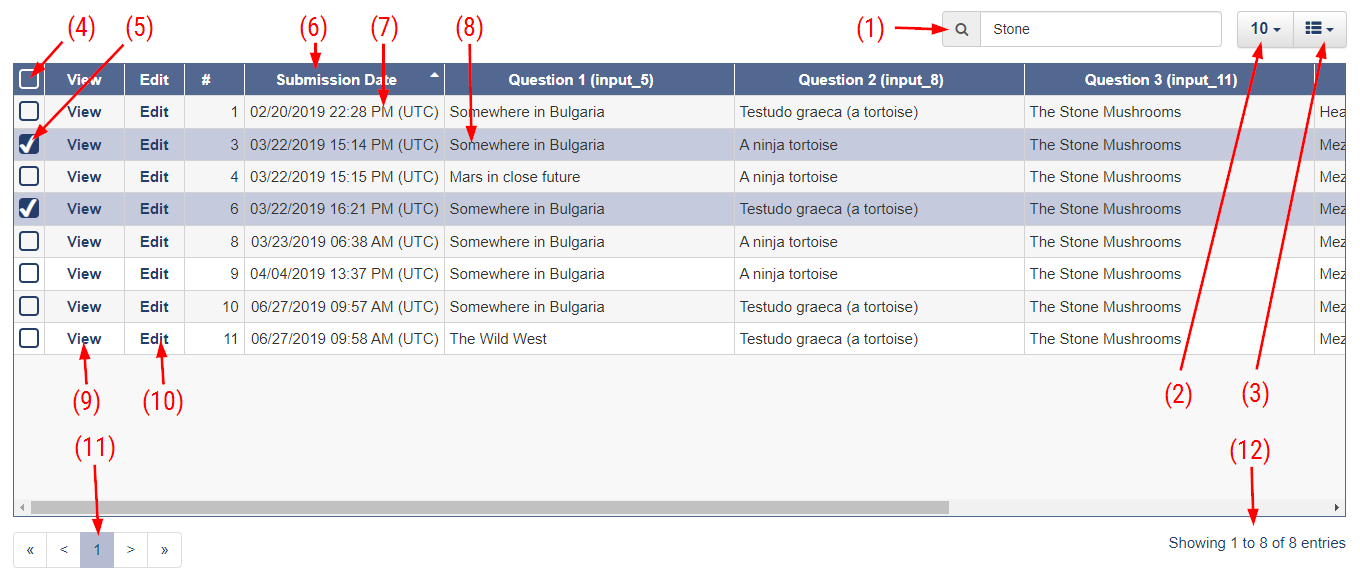
The Submission Grid View looks like the screenshot below and allows various actions described in details:
- (1) - "Search Box" - It allows to filter quickly displayed rows in the grid view by matching the string data in the rows to the searched expression. The result rows are displayed if any string data contains the searched expression.
- (2) - "Number of Rows Displayed" - This dropdown allows you to customize the number of rows which to be shown on the grid view. The available options are: 10, 25, 50, 100, All.
- (3) - "Fields Displayed" - This dropdown allows you to choose which fields to be displayed on the grid view. It contains system information and user fields. Only the fields which are placed in the "Included fields" list on the "Grid and Export View" popup will be available for selection.
- (4) - "Select All" - By checking this checkbox all rows on the current page will be selected.
- (5) - "Select Row" - By checking any of the checkboxes on each row only the row containing the checkbox will be selected. You can select multiple rows in any order.
- (6) - "Field Heading" - This shows the name of a system information field or an information about a user field. The text for a user field consists of the the "Unique Name" and the "ID" of a control. You can click on the Field Heading in order to sort the rows by particular field. You can sort the rows by the particular field by ascending and descending order.
- (7) - "Unselected Row" - A row with unchecked "Select Row" checkbox.
- (8) - "Selected Row" - A row with checked "Select Row" checkbox.
- (9) - "View Submission" - This link will render a form for viewing including submitted data for a particular submission in a panel located under the "Submission Grid View" panel.
- (10) - "Eidt Submission" - This link will render a form for editing including submitted data for a particular submission in a panel located under the "Submission Grid View" panel.
- (11) - "Pagination" - It allows navigation across the pages of the grid view. You can go to specific page by clicking the exact number or you can use the First («) and the Last (») links or the Prev (<) or the Next (>) links in order to navigate respectively to the first, last, previous or next pages if are available and enabled.
- (12) - "Current and Total Number of Entries" - This displays information for the current shown number of submissions and the total number of submissions.
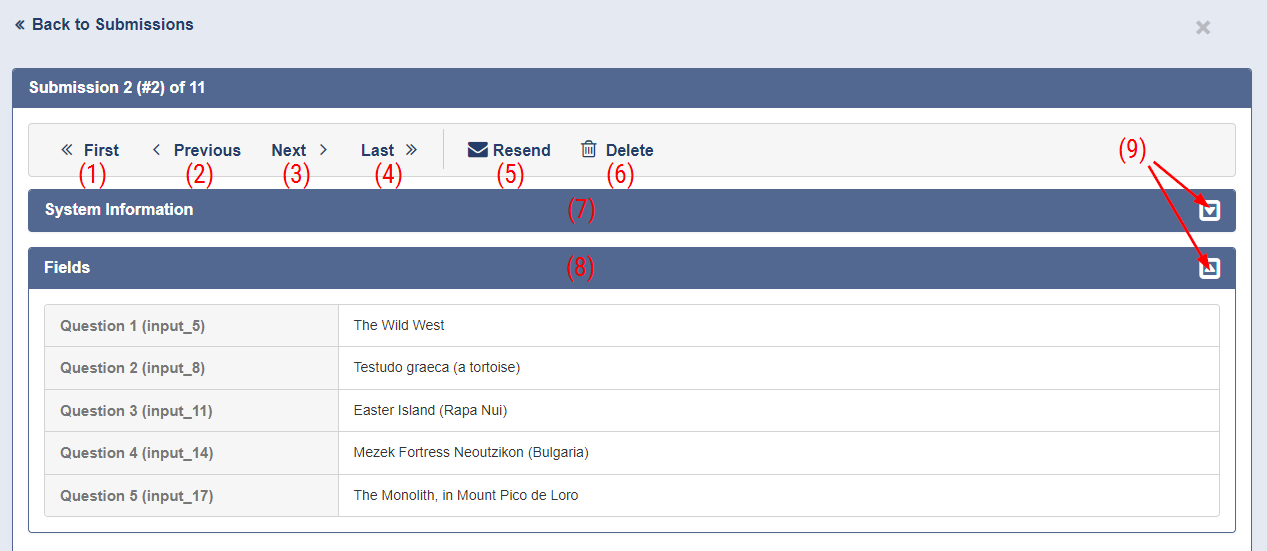
Viewing Individual Submission
By clicking on a submission in the "Submission Grid View" an popup containing the submitted data will be open as shown on the screenshot below. The popup contains an
action bar that has action buttons as well as two panels as described below:
- (1) - "First" - It will load the first submission for the current form.
- (2) - "Previous" - It will load the previous submission for the current form.
- (3) - "Next" - It will load the next submission for the current form.
- (4) - "Last" - It will load the last submission for the current form.
- (5) - "Resend" - It will send again the submission report for this submission to the email address from your profile.
- (6) - "Delete" - It will delete the submission.
- (7) - "System Information" - This panel contains the system information fields. If no system fields are selected in the "Included Fields" list on the "Grid and Export View" popup the panel will not be displayed.
- (8) - "Fields" - This panel contains the user fields. If no user fields are selected in the "Included Fields" list on the "Grid and Export View" popup the panel will not be displayed.
- (9) - "Expand / Collapse" - These buttons allow you to expand or collapse the panels.
In order to close this popup just press "Esc" button or click on the "Back to Submissions" link or the "×" button.